Structuring Rust Projects for Testability
Write better, more testable Rust

In this article, we will see how to structure a Rust project so that it’s easily testable. We will build a simple authentication module that is exposed via REST API while storing the data to PostgreSQL and Redis. We will use actix-web for handling the REST API part, sqlx for interacting with PostgreSQL, and redis-rs for interacting with Redis. We will see how the application is decomposed into smaller components that are testable. The final application source code can be accessed from GitHub.
Background
It’s a well-known fact that incorporating automated testing in a software project leads to better software. Automated tests help to ensure the correctness of the software while also improving its maintainability. So, having automated tests in your software project is a good practice to have.
Unfortunately, incorporating automated tests is not a straightforward thing to do. You’ll need to think through how to structure your project so that it is easily testable. In general, what you need to do is to modularize your software internals into decoupled components that can be tested independently.
I had this issue when I was working on a Rust web project. I tried to look for inspiration from some open source projects. However, the level of testing that they have are not up to my preference. They either have none or simply just do integration tests while skipping unit tests.
The goal of this article is to share with you a solution for the issue above in hope that you (or me in the future) will find it useful. In addition to that, I would be happy to receive any feedback on how you structure your Rust projects so that my Rust “toolbox” expands.
Ports-and-Adapters Pattern
I have limited experience outside of web-based software projects, so take this section with a grain of salt.
Most software can be structured with a Ports-and-Adapters Pattern. In this pattern, you structure your project into the following component types:
- Domain: These components do the domain-specific logic. For example, if your domain is banking, then a domain component has the logic to do a banking-specific functionality such as transferring money between accounts.
- Ports: The “contract” for the external systems to interact with your domain, whether it’s from outside-in or from inside-out.
- Adapters: These components “adapts” the external systems to your ports. For example, an adapter component adapts HTTP requests into operations that are provided by the ports. Another example would be a component that adapts the port into database calls via SQL.
- Application: This component is the one that assembles all the other components. One advantage of Port-and-Adapters pattern is that we can have many adapters for the same port. For example, you can interact with your domain either via REST APIs or command line by providing different adapters for each. When the application component assembles all the components together, it decides which adapter to use.

By structuring the components according to the types above, we then want to test each component independently with the help of a test double. For example, you want to test your domain whether an interaction with the port triggers a specific logic and return an expected value. Another example would be to test HTTP adapters whether an HTTP request will trigger a specific port correctly.

Example In Rust
Now that we have the basic concept of what we want to achieve, let’s apply it in a Rust project. I learn best by studying working examples. So, let’s create one for our case.
Application Description
The application that we want to build is a simple authentication module. This module has these functionalities:
- Register: New users can be registered into the application.
- Login: Registered users can log in by providing a credential and in return will receive a token that can be used for authentication.
- Authenticate: Resolving a given token into a user.
We want the application to be accessible from the web. We also want to use PostgreSQL for storing our user data. In addition to that, we want to store the token in Redis for fast retrieval. Sounds very typical, right?
Architecture
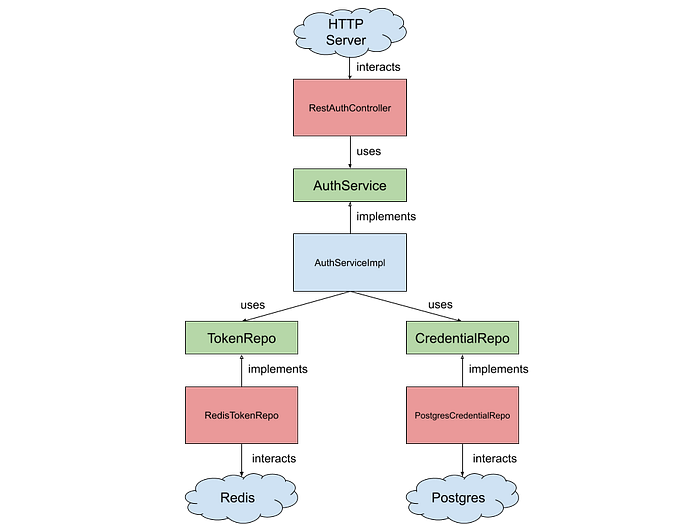
According to the Ports-and-Adapters pattern, the components would be as follows:
Ports:
- AuthService: The port where we expose the domain functionalities
- TokenRepo: The port where our domain interacts with the token storage
- CredentialRepo: The port where our domain interacts with the credential storage.
Domain:
- AuthServiceImpl: The component that houses the auth-specific logic while implementing the AuthService port
Adapters:
- RedisTokenRepo: The component that interacts with Redis by translating TokenRepo port into Redis operations
- PostgresCredentialRepo: The component that interacts with PostgreSQL by translating CredentialRepo port into PostgreSQL operations
- RestAuthController: The component that interacts with AuthService port by translating HTTP requests into calls to the AuthService port
Application
- Main: Assembles the components together so that they are working correctly as an application
Rust Implementation
Now, how does the architecture in the previous section translates to Rust? The general rule of thumb is for ports to be implemented as traits, while the others are implemented as structs, impls or modules. Let’s follow along with the implementation so that you have a clearer picture.
First, let’s see how the source files are structured. The listing below shows you exactly that.
.
├── Cargo.toml
├── migrations
│ └── 000000_init.sql
├── src
│ ├── auth
│ │ ├── auth_service_impl.rs
│ │ ├── mod.rs
│ │ ├── ports.rs
│ │ ├── postgres_credential_repo.rs
│ │ ├── redis_token_repo.rs
│ │ └── rest_auth_controller.rs
│ ├── infrastructure
│ │ ├── mod.rs
│ │ ├── postgresql.rs
│ │ └── redis.rs
│ └── main.rs
└── test-stack.yml
Ports Implementation in Rust
The ports are defined in auth/ports.rs. You see that we have atrait for each port and a struct for each special data structure that the port interacts with.
Domain Implementation in Rust
The domain components, which happen to be only AuthServiceImpl is implemented in a separate file named auth/auth_service_impl.rs. As you can see, we have a struct that holds references to TokenRepo port and CredentialRepo port. We need this reference as the implementation of the AuthServiceImpl requires interaction with these ports.
You’ll also find that there’s a slightly interesting interaction in login functionality, in which we talk to both TokenRepo and CredentialRepo while performing some branching logic.
For the testing part, we only test login functionality as the other ones are very trivial. We use mocks as a test double for TokenRepo and CredentialRepo. These mocks allow us to simulate various responses from those ports and we can use that to verify the login functionality. The mocks are generated using themockall library.
Adapters Implementation in Rust
The adapters are implemented in three separate files: auth/redis_token_repo.rs, auth/postgres_credential_repo.rs, and auth/rest_auth_controller. Let’s look into them one by one.
RedisTokenRepo implements the TokenRepo trait. It holds a reference to Redis Client library for interacting with Redis. For testing, we test against the real thing: a Redis instance running on localhost. We provision a Redis instance via docker so that it’s easy to setup.
Similarly, PostgresCredentialRepo implements the CredentialRepo trait and holds a reference to PostgreSQL connection pool provided by sqlx. Real PostgreSQL database is provisioned for testing as well via Docker. On every test run, we re-create a database specific for this test to ensure test isolation.
The RestAuthController adapter is slightly different than the other adapters. This adapter is driving the interaction with the domain while the others are driven by the domain. This adapter bridges actix-web to our domain. The implementation can be found in auth/rest_auth_controller.rs. For testing, we use the testing functionalities provided by actix-web. The main thing that we want to test is whether a given HTTP request will trigger a port correctly.
Application
Finally, the components that we’ve defined above are assembled in main.rs. As you can see, it setups the connection to PostgreSQL and Redis. Then, it creates the actual components that are used in the application and assemble them together.
We separate out PostgreSQL and Redis to its own file as it has its own initialization logic. This is simply for better readability. These two components are referenced from main.rs as we’ve seen above.
Ideally, we also have integration tests at this level. That is, running the actual application and verify the functionalities are correct. It is, however, out of the scope of this article. If you’d like to learn more, a good starting point is the rust docs themselves.
Conclusion
In this article, we have seen a Rust project structure that helps with testability. The general idea is to structure the project with a Ports-and-Adapters pattern, use traits for the ports, and use test double for the component’s dependencies so that each component can be tested independently.
The full source code of the project in this article is uploaded on GitHub.

